When you are working on a Word document and want to print it on paper, you can simply click “Print” from the Microsoft Word ribbon menu. But what if you are working on multiple word documents and want to print all the files at once?
Microsoft Word makes it very easy to print multiple documents from Windows explorer menu. Surprisingly, you don’t need to open all the documents but can print them all at once. This is perfect when you have a large number of documents to consider and want a quick way to print documents in bulk.
Follow these simple steps:
1. First adjust your printers settings by printing a sample document and see whether the margins and layout are all correct. Do not ignore this step because if the print settings are not at par with your requirements, all the ink and paper will be wasted.
2. Move all the documents to a single folder and open that folder.
3. If the files are consecutive, hold down the shift key and select the first and last file. This will select all the files in the order you want them to print. If you want to print selected files only, hold down Ctrl key and select the files you want to print.
For example: Let’s say you have 10 documents with file names 1.doc, 2.doc and so on. If you want to print all the documents serially, hold down the Shift key and select 1.doc and 10.doc ( i.e the first and last file in the series of documents that are going to be printed).
Instead, if you want to print only 5.doc and 9.doc, hold down the Control keyon your keyboard and follow the next steps.

4. Right click and select “Print” from right click context menu. Windows will now print all the documents one by one in the order you have selected them using the default print settings.
Tip: Don’t try to print multiple documents when any of the document is open in Microsoft Word. First close all the documents and then use the above trick.
The above technique works with any office document, not just word. This is quite handy when you have a large number of documents to print and you don’t want to open each document and manually print them one by one.
In some situations, you may want to print the word document as a PDF and not on paper. Let’s say you are working on a report and want to send the final copy to a client for verification purpose.
It makes perfect sense to first send a PDF copy of the Word document to the client, see his response, make corrections to the original document if it is asked for and then print the hard copy of the report on paper.
Microsoft Word makes it very easy to print a word document as PDF. In case you are unaware of the “Print as PDF” feature, here are the steps which needs to be followed:
1. Go to Microsoft Download Center website and download the “Save as PDF or XPS’ office Add-in.
The “Save as PDF” add-in for Microsoft Office 2007 allows you to export and save Word documents as PDF, there is no need to use expensive PDF editing software programs like Adobe Acrobat, Foxit Reader and so on.
2. After the program has been installed, open the document in Microsoft Word and you will see a new ‘Print as PDF’ option, as shown below:

3. Export the doc or docx file as PDF and you are done.
Another good idea to print multiple files or office documents would be to combine all of them into a single document and print the newly created document from the first page to the last. The advantage is that this technique works on all operating systems e.g Windows XP, Windows Vista or Windows 7 and you need not worry about whether a specific page of a specific file will be printed or not.
Here are the steps that needs to be followed:
1. First create a backup of all the documents, in case you want to revert the changes later.
2. Open the first document in the list and move the cursor to the end of the document. You will be adding the content of the second document at the end of the first document, hence the cursor needs to be positioned right at the place where the content of the first document finishes.
3. In case you want to insert a document somewhere in the middle of the already opened document, you have to position the cursor at the desired location.
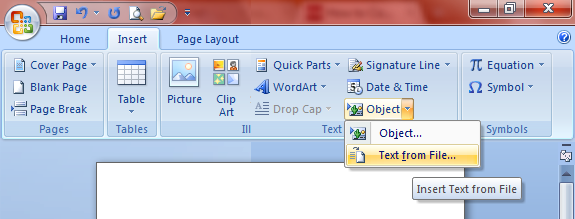
4. Once you are done with the position, switch to the “Insert” tab and select “Insert text from file”.

5. This will allow you to merge multiple word documents into a single document by pulling in the text and content of another document into the current one.
6. Similarly, add up text and content from all the documents into the currently opened document using the ‘Insert text from file” option. The only catch is that Microsof Word wont preserve the formatting of individual documents, so you will need to adjust the formatting at the end.
7. When you are done adding all the documents to the final copy, there are two options
These are just a couple of ways to manage the print jobs of multiple documents in one go. You may also want to check out Google Docs cloud print feature which allows you to send print jobs to your cloud connected printer directly from a mobile device. This is especially useful, when you’re travelling and want to print a whole bunch of documents stored in your Google Docs account.
A slightly complicated procedure would be to sync Google Docs documents with Microsoft office and use Google’s cloud print feature to print multiple documents from anywhere, any computer.